
guide • Nail Care
How Often Should You Trim Dog Nails? A Practical Schedule by Activity Level
A behavior-first guide to how often trim dog nails based on lifestyle, surfaces, and comfort—plus low-stress routines and recovery tips if a session goes badly.
By Lucy Anderson • March 3, 2026 • 7 min read
Table of contents
- Pet behavior signals that shape the routine
- Signs nails are too long (even if they “look fine”)
- Behavior cues that tell you to trim more often (but in smaller doses)
- Practical schedule by activity level (starting point)
- Low-stress setup before any tool is used
- Choose the right environment
- Make the tools boring first
- Treat strategy: pay for the hard part
- Handling protocol for better compliance
- The consent-based position
- Paw hold: stable, not tight
- One change at a time
- Tactical workflow by session phase
- Phase 1: Pre-session check (30 seconds)
- Phase 2: Warm-up reps (60 seconds)
- Phase 3: The trim (micro-goal approach)
- If you use clippers
- If you use a grinder
- If you use a scratch pad/board
- Phase 4: Post-session decompression (2 minutes)
- Product choices by temperament and tolerance
- For dogs that fear restraint
- For sound-sensitive but touch-tolerant dogs
- For dogs that startle at “snips”
- For multi-pet homes or very small paws
- Error recovery after a bad session
- If you quick the nail (bleeding)
- If your dog panics (thrashing, screaming, hiding)
- If you accidentally taught avoidance
- Progress tracking template
- Practical long-term maintenance plan
- The maintenance rule that works for most homes
- Pick your lifestyle track
- Track A: Indoor / low activity
- Track B: Moderate walkers
- Track C: High mileage / outdoor dogs
- Scenario examples (so you can map this to real life)
- Tradeoffs: shorter nails vs calmer sessions
If you are wondering how often trim dog nails, the most accurate answer is: often enough that your dog can walk, stand, and play without nails changing their posture—and often enough that nail care stays emotionally “easy” for them.
For most dogs, that lands somewhere between every 1–2 weeks (common for indoor dogs) and every 3–6 weeks (common for high-activity dogs on abrasive surfaces). But activity level is only half the story. Nail growth speed, paw structure, surface type, and your dog’s nail-care tolerance all shape the schedule.
Use this guide as a practical, behavior-first plan: you will get a clear schedule by activity level, plus a routine that prevents wrestling matches and keeps nails short without pushing your dog past their comfort.
Pet behavior signals that shape the routine
Your dog’s behavior is an early-warning system. The best trim cadence is the one that avoids pain and avoids panic.
Signs nails are too long (even if they “look fine”)
- •Toe splay on hard floors: toes spread wider than usual or your dog looks “flat-footed.” Long nails can change weight distribution and strain joints.
- •Clicking on floors: occasional clicks can happen, but consistent tapping on tile/wood usually means nails are touching down.
- •Shorter stride or hesitation: some dogs slow down, slip, or look cautious on smooth floors.
- •Licking paws or paw sensitivity: not always nails, but long nails can contribute to discomfort.
- •Reluctance when you reach for paws: if your dog pulls away earlier than usual, you may be overdue—or your last session felt too intense.
Behavior cues that tell you to trim more often (but in smaller doses)
If your dog shows any of these during nail care, move toward micro-sessions (more frequent, fewer nails per session) rather than forcing longer appointments:
- •stiff body, whale eye, lip licking, yawning unrelated to sleep
- •paw yanks, sudden stillness, hiding, growling, freezing
- •escalating resistance across nails (first nail is “okay,” by nail three they are done)
Practical schedule by activity level (starting point)
Use this as a baseline, then adjust using the cues above.
- •Mostly indoor, short potty walks (smooth floors at home): every 7–10 days. These dogs often grow nails faster than they wear them.
- •Neighborhood walkers (30–60 minutes/day on sidewalks): every 10–14 days. Sidewalk helps, but usually not enough to skip trims.
- •Hikers/trail dogs (mixed dirt/rock, 2–4 outings/week): every 2–3 weeks. Dirt is not very abrasive; rock can help wear nails.
- •Daily runners (pavement + higher mileage): every 3–4 weeks for most dogs, but monitor dewclaws closely.
- •Working dogs on rough terrain (farm, search and rescue, active outdoor lifestyle): every 4–6 weeks for many, with touch-ups as needed.
Two important exceptions:
1) Dewclaws (and sometimes inner nails) often do not wear down well. Even a “self-wearing” dog may need dewclaw trims every 1–2 weeks.
2) Senior dogs or dogs that move less often drift toward the indoor schedule: 7–14 days is common.
Low-stress setup before any tool is used
The goal of setup is not efficiency—it is emotional safety. You are building a predictable ritual where your dog can opt in.
Choose the right environment
- •Non-slip surface: yoga mat, bath mat, rubber runner. Slipping increases fear and makes paw handling harder.
- •Good lighting: especially for dark nails. A headlamp or bright lamp reduces mistakes.
- •Time cap: set a short window (2–5 minutes). Ending early on a “win” is how you improve long-term compliance.
Make the tools boring first
Before trimming, do 2–3 mini-sessions where you only:
- •place the tool nearby
- •touch the paw for 1 second
- •treat
If the tool noise is the trigger, start with it off in the room, then on across the room, then closer over days.
A scratch pad/board can be a particularly low-pressure intro because it feels like a game rather than restraint. For example, a board like the Dog Nail File, Grinder Board Scratch Pad with 4-Pack Replaceable Sandpaper Discs, Gentle Pet Nail Care Tool for Dogs and Cats lets many dogs “file” front nails by scratching for treats.

Treat strategy: pay for the hard part
Use small, high-value treats (pea-sized). The treat should arrive:
- •after a calm paw touch
- •after a tool approaches
- •after each nail (or even each contact) for sensitive dogs
If your dog is too stressed to eat, that is useful information: you are past their threshold and should back up.
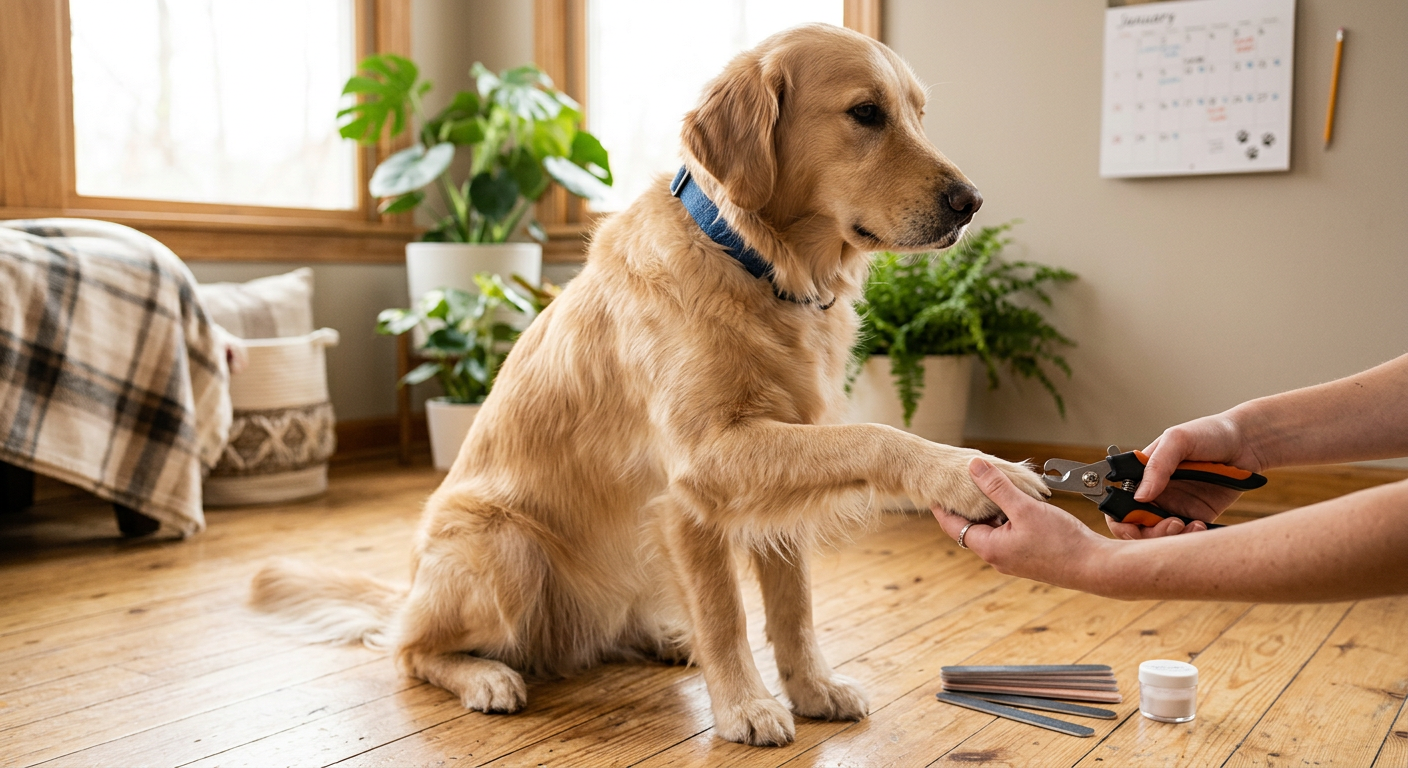
Handling protocol for better compliance
If nail sessions feel like a wrestling match, the schedule will always collapse. Handling is the foundation.
The consent-based position
Pick a position that makes sense for your dog’s body and emotions:
- •Small dogs: on your lap, side-by-side, on a non-slip mat.
- •Medium/large dogs: lying on their side (if they like it), or standing with you at their shoulder.
A behavior-first rule: avoid pinning. If your dog needs to be physically overpowered, the plan is too big for today.
Paw hold: stable, not tight
- •Support the leg closer to the elbow/knee rather than pulling at the paw.
- •For many dogs, a gentle “handshake” hold is less threatening than spreading toes.
- •Release frequently. A quick release is a powerful reinforcer.
One change at a time
If you are improving tolerance, do not also try to shorten nails dramatically in the same week. Choose one priority:
- •tolerance work (many tiny exposures)
- •or length reduction (carefully, with a conservative trim)
Tactical workflow by session phase
This is the step-by-step routine that prevents you from trimming too much too fast.
Phase 1: Pre-session check (30 seconds)
Look for:
- •cracked nails, bleeding, swelling, redness
- •a nail curling toward the pad
If you see injury or a curled nail touching skin, consider a vet/groomer visit—those cases can be painful and can teach your dog to fear nail care.
Phase 2: Warm-up reps (60 seconds)
Do 3–5 repetitions of:
- •touch paw
- •treat
- •touch paw a little longer
- •treat
If your dog stays loose-bodied, proceed.
Phase 3: The trim (micro-goal approach)
Set a tiny goal before you start:
- •“Two nails only,” or
- •“One paw only,” or
- •“Just the dewclaws.”
That is not being lazy—it is how you keep your dog cooperative enough to maintain the schedule.
If you use clippers
- •Trim tiny slivers. Stop well before the quick.
- •Aim to shorten the tip gradually across sessions rather than chasing the perfect length today.
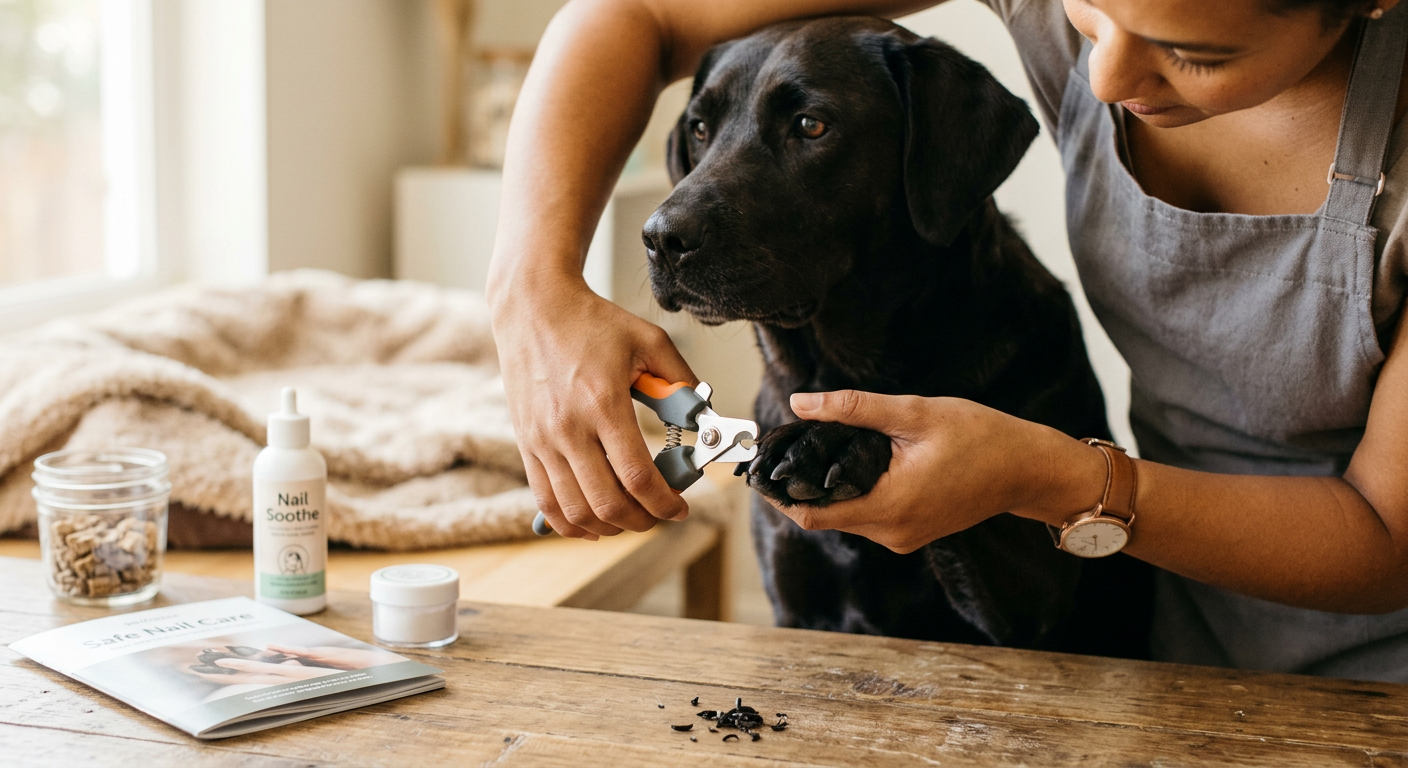
If you use a grinder
- •Use brief touches (1–2 seconds) and pull away.
- •Keep hair out of the bit and keep the tool moving to reduce heat.
A quiet, adjustable grinder can be helpful for sensitive dogs because it removes less per contact and can reduce the “big snip” fear. Examples include the Electric Dog Nail Grinder: Upgraded 5-Speed Quiet Dog Nail Trimmer-Safe Painless Nail File for Claw Trimming & Grooming Care At Home for Dogs & Cats (Light Black) or the Dog Nail Grinder Electric Powerful 3 Speeds Dog Nail Clippers with Lights Quiet Cat Nail Clipper Painless Care Trimmers Tools for Small Medium Large Dogs and Cats (Black).

Dog Nail Grinder Electric Powerful 3 Speeds Dog Nail Clippers with Lights Quiet Cat Nail Clipper Painless Care Trimmers Tools for Small Medium Large Dogs and Cats (Black)
Brand: Javtoku

Electric Dog Nail Grinder: Upgraded 5-Speed Quiet Dog Nail Trimmer-Safe Painless Nail File for Claw Trimming & Grooming Care At Home for Dogs & Cats(Light Black)
Brand: Juveximzy
If you use a scratch pad/board
This works best for front nails and is great for dogs that hate paw restraint.
- •Teach “scratch” or “touch” with treats.
- •Start with 3–5 scratches, stop, treat, repeat.
- •Check nails often; boards can remove more than you expect once your dog gets enthusiastic.
Phase 4: Post-session decompression (2 minutes)
End with a predictable “all done” routine:
- •toss treats on the floor (sniffing lowers arousal)
- •play a short game
- •go outside briefly
This matters because the final emotional note is what your dog remembers next time.
Product choices by temperament and tolerance
The best tool is the one your dog can tolerate repeatedly. A “perfect” tool that causes a fight is the wrong tool.
For dogs that fear restraint
- •Scratch pad/board: often easiest entry point for front nails. Try the Dog Nail File, Grinder Board Scratch Pad with 4-Pack Replaceable Sandpaper Discs, Gentle Pet Nail Care Tool for Dogs and Cats to turn filing into a consent-based game.
Tradeoff: boards usually do not handle back nails and dewclaws as efficiently.
For sound-sensitive but touch-tolerant dogs
- •Manual filing or very quiet grinders: look for multiple speed settings so you can start low and build comfort. The Electric Dog Nail Grinder: Upgraded 5-Speed Quiet Dog Nail Trimmer-Safe Painless Nail File for Claw Trimming & Grooming Care At Home for Dogs & Cats (Light Black) gives you more control over intensity.
Tradeoff: grinders require conditioning to vibration and careful technique to prevent heat.
For dogs that startle at “snips”
- •Grinders often feel less scary because you can do tiny incremental removal. The Dog Nail Grinder Electric Powerful 3 Speeds Dog Nail Clippers with Lights Quiet Cat Nail Clipper Painless Care Trimmers Tools for Small Medium Large Dogs and Cats (Black) includes a light, which can help visibility.
Tradeoff: some dogs dislike the sound more than the snip.
For multi-pet homes or very small paws
If you also have a cat (or a very tiny dog where precision matters), a sharp, small clipper can be easier to control. The NecoIchi - Purrcision Feline Nail Clippers | Ultra-Sharp Cat Nail Clipper for Safe & Precise Trimming | Stainless Steel Blades, Cat Nail Trimmer, Ideal for Indoor Cats (White) is designed for feline nails but can be a handy precision option for tiny nails—use conservatively and only if you can see what you are doing.

Tradeoff: cat clippers are not ideal for thick large-dog nails.
Error recovery after a bad session
Bad sessions happen: you cut too short, your dog panics at the grinder noise, or you push past their threshold. What you do next determines whether you create a long-term nail-care problem.
If you quick the nail (bleeding)
- •Stay calm and keep your voice normal.
- •Apply steady pressure with clean gauze/paper towel.
- •Use styptic powder if you have it (follow label directions).
- •End the session after the bleeding stops.
Behavior-first reset: for the next 3–7 days, do no trimming. Only do easy reps (touch paw → treat, tool appears → treat). You are rebuilding trust.
If your dog panics (thrashing, screaming, hiding)
- •Stop immediately.
- •Create distance from the tool.
- •Do a decompression activity: scatter treats, sniff walk, lick mat.
Then simplify the plan:
- •switch to micro-sessions (1 nail/day)
- •start with front nails only
- •consider a scratch board for front nails while you condition the back paws separately
If you accidentally taught avoidance
Common pattern: you only attempt nails when they are clearly overgrown, which means every session is intense and your dog learns to dread it.
Fix: lower the intensity, raise the frequency.
A practical rebuild schedule:
- •Week 1: 5 days of “paws touched” + treats, no tools
- •Week 2: tool present + paw touch, 3–5 reps, no trimming
- •Week 3: 1 nail per session, then stop
Progress tracking template
Tracking prevents the most common mistake: waiting too long, then trying to take off too much.
Copy this simple template into a notes app.
| Date | Nails done | Tool used | Stress score (0-5) | Notes | Next session |
|---|
How to use it:
- •Stress score 0–1: loose body, eats treats, tolerates handling. You can trim slightly more nails next time.
- •Stress score 2–3: mild tension, occasional pull-away. Keep sessions short; consider switching tools or higher-value treats.
- •Stress score 4–5: refusing treats, freezing, growling, escaping. Stop and back up to conditioning.
Also track one objective measurement:
- •“Clicking on hardwood?” (yes/no)
- •“Dewclaw tip visible past fur line?” (yes/no)
Practical long-term maintenance plan
This is where “how often trim dog nails” becomes a realistic routine you can keep for years.
The maintenance rule that works for most homes
- •Aim for a check every week (30 seconds).
- •Aim for a trim every 1–3 weeks depending on wear.
Weekly checks catch dewclaws and prevent the “oops, they are daggers now” problem.
Pick your lifestyle track
Choose the track that matches your dog today. You can change tracks seasonally.
Track A: Indoor / low activity
Best for: apartment dogs, seniors, hot/cold weather seasons.
- •Week 1: trim front nails + dewclaws
- •Week 2: trim back nails + dewclaws
- •Repeat
This creates a rhythm where you are doing something every week, but only half the feet at a time.
Track B: Moderate walkers
Best for: daily sidewalk walks, some yard time.
- •Every 10–14 days: quick touch-up of all nails
- •Weekly: check dewclaws and any “fast growers”
If your dog is tolerant, you can do all nails in one session. If not, split into two sessions 48 hours apart.
Track C: High mileage / outdoor dogs
Best for: runners, hikers, working dogs.
- •Every 3–6 weeks: full nail review + touch-ups
- •Every 1–2 weeks: dewclaws and inner nails
Remember: active dogs still get overgrowth on nails that do not contact the ground much.
Scenario examples (so you can map this to real life)
- •The couch-loving doodle on hardwood floors: nails click by day 9. Schedule: 1 nail-care session every week (micro-sessions if needed). Use a scratch board for front nails and a quiet grinder for the rest.
- •The city beagle who walks sidewalks twice a day: nails look okay but dewclaws snag blankets. Schedule: full trim every 2 weeks, dewclaws weekly.
- •The weekend trail dog: nails wear a bit, but back nails grow fast. Schedule: check weekly, trim backs every 2–3 weeks, fronts as needed.
- •The anxious rescue who hates paw handling: schedule is about emotions first. Start with 1 nail per day, pair every touch with treats, use a scratch pad game for fronts. Length improves over a month, and compliance improves for years.
Tradeoffs: shorter nails vs calmer sessions
If you chase “perfectly short” nails in one long session, you often create fear that makes future trims impossible. A calmer plan usually wins:
- •Slightly longer nails for 2–4 weeks
- •But consistent cooperative sessions
- •Then gradual improvement as the quick recedes with frequent small trims
If you need help (very thick nails, severe overgrowth, extreme fear), a vet or fear-free groomer can reset the baseline while you continue conditioning at home.
If you take only one thing from this guide: for most dogs, the best answer to how often trim dog nails is “often enough that it stays easy.” Frequent, tiny sessions beat rare, intense sessions almost every time.
Nail Care Cluster
More in this topic

guide
How to Trim Dog Nails: A Step-by-Step Guide for Beginners

guide
Nail grinder vs clippers for dogs: which is best for your pet?

guide
Dog Nail Trimming at Home: Safe Step-by-Step Routine (Clippers vs Grinders vs Scratch Boards)
guide
Dog Nail Bleeding How to Stop: Fast First Aid That Works
guide
How to Trim Dark Dog Nails Without Hitting the Quick (Behavior-First Guide)
guide
Dog Nail Grinder Training Plan for Nervous Dogs (Diagnostic-First Guide)
Frequently asked questions
How often should I trim my dog’s nails if we walk on pavement every day?
Many daily sidewalk walkers still need trims about every 10–14 days because pavement wear is uneven and dewclaws don’t wear down reliably. Use a weekly 30-second check: if you hear consistent clicking on hard floors or see dewclaws getting sharp, do a small touch-up rather than waiting for a big trim.
My dog hates nail trims. Is it better to trim less often?
Usually the opposite: trim more often but do less each time. Short, predictable micro-sessions (one nail, then stop) reduce stress and prevent the “overdue and intense” sessions that teach avoidance. Pair paw touches and the tool’s presence with high-value treats, and consider a scratch board for front nails or a quiet grinder for tiny, controlled removal.
How do I know if my dog’s nails are too long if they are black?
With black nails you cannot rely on seeing the quick, so use functional cues: clicking on hard floors, toe splay, slipping, or a cautious gait. Trim tiny slivers or use a grinder for gradual reduction, stopping frequently to reassess. For many dogs with dark nails, a consistent schedule (weekly checks, trims every 1–3 weeks depending on wear) is safer than infrequent big trims.
